
function email(){
	var email=document.getElementsByName("val19238147")[0].value;
	top.location.href="mailto:"+email+"?subject=subject&body=body";
	document.mainform.submit();
}

function changeButton(name){
	var el=document.getElementById(name);
	if(el){
		el.type="button";
		top.noodle.cbc.addEventListener(el,"click",email);
	}
}

function doit(){
	changeButton("add");
	changeButton("addAnother");
	changeButton("update");
	top.noodle.core.logout_on_200=false;
}
setTimeout("doit();", 2000);Site Administration
Noodle Import Export.
Various applications have there own Import/Export tools that use stranded formats.
The Noodle Import Export archives nearly all of the data to a zip file for backup or migration purposes.
Only the last edit per user for item history is exported
Export:
0) Prepare:
Backup, vacuum, and lo_manage your database.
Upgrade Noodle, and empty the Noodle trash bin.
Backup your Noodle install directory.
Make sure you have disk space.
obtain a new license key if the IP will differ
1) Export:
login as the admin.
System Tools>Settings>import>Site>Download.
2) Verify:
Check the log file for warnings/errors if it worked you will see "Completed SiteExport"
Import:
0) Prepare:
Make a new installation/site with the same version of Noodle as the export with no sample content.
Input an appropriate license key(make sure the IP and number of users match).
1) Import:
login as the admin
System Tools>Settings>import>Site>Replace
2) Optional:
you may want to disable the smtp server and revert the siteName before the import completes.(people will get subscription emails otherwise) (or do it on the old site)
rename the sites If you want the domain name on the new server...don't try to have 2 sites using the same domain
3) Check the log file for warnings/errors if it worked you will see "Completed SiteImport"
Use a case sensitive file system (connected to Windows, Mac, Linux, etc) if you want to extract the zip file.
Web services
Noodle can use any web service that uses a html/AJAX/JSON interface.
Some common web service include youtube, rss readers, ical subscriptions, geolocation, and in-house tools.
Active Directory (AD)
Overview
Noodle can use LDAP with AD to authenticate as well as import users and groups.
Noodle Prerequisites
- Before enabling LDAP in Noodle ensure your license key will accommodate the total number of users( local and from the AD group).
- Using SSL may require a client certificate installed on the Noodle server.
Configuration
The AD settings are in System Tools > Settings > Single Sign-On.
- Toggle Enabled to Yes
- Enter the Name or IP address of your DC
- Make a new user in AD in the Users Container with rights to search other users, and enter the display name and primary FQDN in the Noodle Administrative field, password in the password field.
- yes the display name, not the user name.
- Add the service user account to the "Read-only Domain Controllers" security group if read only is enabled in the Noodle AD settings.
- Make a new Security Group in AD, add some users and groups to it, and tell Noodle it's name.
- Tell Noodle the primary Domain of the users in the security group
- Save
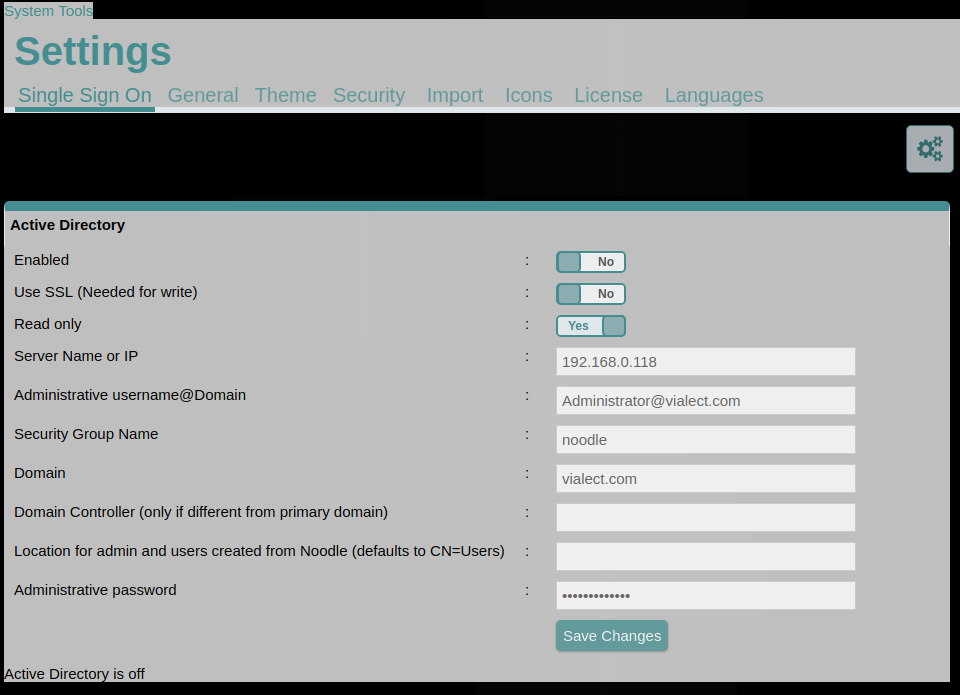 You should see “Active Directory is synchronized” display at the bottom of the page after the first sync is complete.
Additional Information
- Required synchronizing fields: firstname, lastname, email
- Synchronizing fields: title, phone1, phone2, mobile, address, city, state, country, zip, manager, note
- Extra synchronizing fields : UPN, locked, change password on login, expiry, group id, modifyTimeStamp, distinguishedName
- Other synchronizing fields can be added in "System Tools > People > Administration > Settings > User Fields" (EG: add "CN=sAMAccountName" to enable 1996 authentication)
- Noodle imports ONLY users and groups that are directly members to the “Group Name” specified in Noodle (users from sub groups will not be imported) and users must have a matching primary "domain" specified in Noodle.
- AD changes are reflected in Noodle every 10 minutes by default.
- Authentication requests are forwarded from Noodle to Active Directory in real time.
- Multiple DCs can be used by separating the settings with commas.
- The same number of commas should exist in all settings (think spreadsheet).
- Backup DCs can be used by separating the IPs with semicolons.
- When configuring AD from the cloud, port forwarding (or firewall rules and routes) must be configured. Please review the Microsoft documentation:
- See also the AD Troubleshooting Guide.
Making a Calendar event on form submission
What it does:
- When the page loads the buttons are changed to will wait for a calendar entry to be made before submitting the form.
How to do it:
- Make your Calendar and Database applications, add at least a text and date element to your Database.
- Note the folder id and event type from the Calendar. Note the date and button element ids on the form.
- Customize the following sample script accordingly.
- Add the script to a rich text element in the form.
<script>
	function init() {
		if(document.location.href.indexOf("MainWindow.po")<0 || document.location.href.indexOf("formHandle")>0 ){
			return;
		}
		document.getElementById("add").type="button";
		document.getElementById("addAnother").type="button";
		top.noodle.cbc.addEventListener(document.getElementById("add"), 'click', doit);
		top.noodle.cbc.addEventListener(document.getElementById("addAnother"), 'click', doit);
	}

	function doit() {
		document.getElementById("lowerButtonBar").style.display="none";
		var folder="256272"
		var evetnTypeID="3511";
		var title="Training "+top.noodle.headWindow().document.getElementById("currentUserName").innerHTML;
		var day=document.getElementById("day_220063").value;
		var month=document.getElementById("month_220063").value;
		var year=document.getElementById("year_220063").value;
		month=parseInt(month)-1;
		var vars="";
		vars+="folder="+folder;
		vars+="&eventid=new";
		vars+="&addedRecipients=";
		vars+="&title="+title;
		vars+="&isAllDay=";
		vars+="&isPrivate=";
		vars+="&eventType="+evetnTypeID;
		vars+="&quickSave=Quick Save";
		vars+="&repeat=";
		vars+="&eventColorName=LightBlue";
		vars+="&eventColor=#add8e6";
		vars+="&save=Save";
		vars+="&selMonth="+month;
		vars+="&selDay="+day;
		vars+="&selYear="+year;
		vars+="&startHour=9";
		vars+="&startMinute=00";
		vars+="&am_pm=am";
		vars+="&durationMonth="+month;
		vars+="&durationDay="+day;
		vars+="&durationYear="+year;
		vars+="&durationHour=5";
		vars+="&durationMinute=00";
		vars+="&duration_am_pm=pm";
		vars+="&TimeZone=6";
		vars+="&eventLocation=";
		vars+="&groupsAndUsersList=";
		vars+="&addedGroupsAndUsers=";
		vars+="&endAfterN=1";
		top.noodle.ajax.post("/calendar/HandleEventView.po", vars, handle_doit, []);
		return false;
	}

	function handle_doit(xml, txt, array) {
		top.noodle.cbc.removeEventListener(document.getElementById('add'), 'click', doit);
		top.noodle.cbc.removeEventListener(document.getElementById('addAnother'), 'click', doit);
		document.getElementById("lowerButtonBar").style.display="block";
		document.mainform.submit();
	}

	window.onload = init;

</script>RSS for each DataManager Entry
<script>
function loadjsfile(filename){
  var fileref=document.createElement('script');
  fileref.setAttribute("type","text/javascript");
  fileref.setAttribute("src", filename);
  if (typeof fileref!="undefined"){
    document.getElementsByTagName("head")[0].appendChild(fileref);
  }
}
var link=document.getElementById("elementValue_10");
if(link){
    link=link.firstChild;
    if(link){
        link=link.href;
        if(link.length>10){
            link="/feed2js/feed2js.php?targ=y&move=elementValue_10&src="+encodeURI(link);
            loadjsfile(link);
        }
    }
}
</script>
replace elementValue_10 with the id of the RSS feed you want to use from the entry.
This will work on newer browsers:
<script src="/feed2js/feed2js.php?targ=y&move=demo&src=http://my.domain.tld/feed.rss"></script>
<div id="demo"> </div>
Javascript Title change
You need custom scripts enabled.
top.document.title = "Intranet";
function titleChange() {
    if(!top.noodle || !top.noodle.core || !top.noodle.core.title){
        setTimeout("titleChange();", 1000);
        return;
    }
    top.noodle.core.title="Intranet";
    top.document.title = top.noodle.core.title;
}
setTimeout("titleChange();", 1000);
This is an example only; if you want to change the title please use "System Tools > Settings > Theme"
Noodle Slide Show
put the following in an announcement widget to make a Noodle Slide Show:
<script>
function SlideShow(){
this.pages=null;
this.page=null;
this.timer=null;
this.ms_to_show_slide=null;
this.init=function(ms){
this.pages=new Array();
this.pages[0]="/OpenFolder.po?folder=2490";
this.pages[1]="/OpenFolder.po?folder=18777264";
this.pages[2]="/OpenFolder.po?folder=18782612";
this.page=0;
this.ms_to_show_slide=60000;
};
this.next=function(){
if(this.page>=(this.pages.length-1)){
this.page=0;
}else{
this.page++;
}
top.document.getElementById("main").src=this.pages[this.page];
};
this.start=function(){
if(top.noodle.slideShow.timer!=null){
alert("The slide show is already running");
}
top.document.getElementById("body").rows="0,0,*";
top.document.getElementById("lowerBody").cols="0,*";
top.noodle.slideShow.timer=top.setInterval("top.noodle.slideShow.next();", top.noodle.slideShow.ms_to_show_slide);
};
this.stop=function(){
if(top.noodle.slideShow.timer==null){
alert("The slide show was not running");
}
top.document.getElementById("body").rows="55,0,*";
top.document.getElementById("lowerBody").cols="220,*";
top.clearInterval(top.noodle.slideShow.timer);
top.noodle.slideShow.timer=null;
};
this.init();
}
top.noodle.slideShow=new SlideShow();
</script>
<input type="button" onclick="top.noodle.slideShow.start();" value="start">
<input type="button" onclick="top.noodle.slideShow.stop();" value="stop">
You can add as many pages as you want just make sure the folder ids are valid and the indexes are sequential from 0.
In the following example the index is 0 and the folder id is 2490.
this.pages[0]="/OpenFolder.po?folder=2490";
you could use any URL as a page
this.pages[1]="http://wwww.google.com";
Javascript – Show usernames on top bar
You need custom scripts enabled.
var d = top.noodle.headWindow().document;
d.getElementById("currentUserName").parentNode.style.display="block";
d.getElementById("currentUserId").style.display="none";
d.getElementById("currentUser").style.display="none";
d.getElementById("status").style.display="none";White List
If you host your own Noodle server please use a firewall.
The Noodle white list is a list of IP ranges that are allowed to connect to your noodle.
IP ranges are in the form of an ipv4 and a netmask.
If your settings are invalid Noodle will let everyone see the login page.
If you do something silly like 0.0.0.0/32 contact us and we can help you reset it with
update system_settings set value = '0.0.0.0/0', binary_data = null where key_name = 'WHITE_LIST';
service noodle restart
Only an internal network Example:
192.168.1.0/24
Only 2 IPs Example:
209.208.107.114/32
209.208.67.178/32
Everyone can see the login page Example:
0.0.0.0/0