Author Archives: TimL

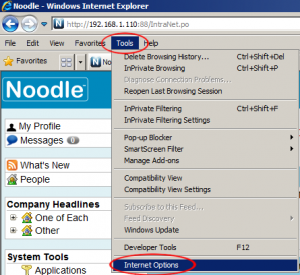
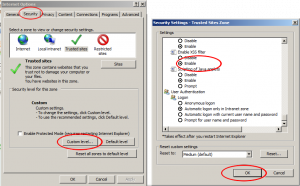
You need custom scripts enabled.

var doc=top.noodle.headWindow().document;
var newNode =doc.getElementById("logo");
doc.body.insertBefore(newNode, doc.body.firstChild);
top.document.getElementById("body").rows="110,0,*";
newNode.style.position="inherit";
newNode.style.height="55px";
newNode.style.width="100%";

or you can use an image hosted elsewhere:

var doc=top.noodle.headWindow().document;
doc.getElementById("logo").style.display="none";
var newNode = doc.createElement('img');
newNode.src="https://vialect.com/wp-content/themes/quadro/images/logo.png";
newNode.style.height="55px";
newNode.style.width="100%";
doc.body.insertBefore(newNode, doc.body.firstChild);
top.document.getElementById("body").rows="110,0,*";

function email(){
	var email=document.getElementsByName("val19238147")[0].value;
	top.location.href="mailto:"+email+"?subject=subject&body=body";
	document.mainform.submit();
}

function changeButton(name){
	var el=document.getElementById(name);
	if(el){
		el.type="button";
		top.noodle.cbc.addEventListener(el,"click",email);
	}
}

function doit(){
	changeButton("add");
	changeButton("addAnother");
	changeButton("update");
	top.noodle.core.logout_on_200=false;
}
setTimeout("doit();", 2000);

Moving Noodle from one environment to another can be done in a few ways:

  • Copy the files (linux only).
  • Install Noodle on the new box and reconfigure or copy the conf files over.

Migrating your RDBMS data from one environment to another can be done in a few ways:

Various applications have there own Import/Export tools that use stranded formats.

The Noodle Import Export archives nearly all of the data to a zip file for backup or migration purposes.

Only the last edit per user for item history is exported

Export:

0) Prepare:

Backup, vacuum, and lo_manage your database.
Upgrade Noodle, and empty the Noodle trash bin.
Backup your Noodle install directory.
Make sure you have disk space.
obtain a new license key if the IP will differ

1) Export:

login as the admin.
System Tools>Settings>import>Site>Download.

2) Verify:

Check the log file for warnings/errors if it worked you will see "Completed SiteExport"

Import:

0) Prepare:

Make a new installation/site with the same version of Noodle as the export with no sample content.
Input an appropriate license key(make sure the IP and number of users match).

1) Import:

login as the admin
System Tools>Settings>import>Site>Replace

2) Optional:

you may want to disable the smtp server and revert the siteName before the import completes.(people will get subscription emails otherwise) (or do it on the old site)
rename the sites If you want the domain name on the new server...don't try to have 2 sites using the same domain

3) Check the log file for warnings/errors if it worked you will see "Completed SiteImport"

Use a case sensitive file system (connected to Windows, Mac, Linux, etc) if you want to extract the zip file.
The Noodle search is located on the top bar, additionally you can search from the search widget and some application types.

  • Search indexes file names, descriptions, keywords, and the content of text files( and other formats and meta data if configured).
  • If your search results are to broad you can click on the advanced link and filter them.
  • Words in file names and titles are prioritized over those in the contents.
  • If you are looking for the most resent changes on Noodle try the What's New.

Noodle allows you to change much of it's appearance and some of it's behavior.

The simple changes:

  • Change the logo in the top left and on the login screen in System Tools>Settings>General Settings
  • Change the Colors from the same place.
  • add, remove, sort, and nest applications in the navigation.
  • add some fancy widgets

Advanced changes:

  • Backup a copy of the CSS and customize it in the settings.

Appearance and beyond:

Overview

Noodle can use LDAP with AD to authenticate as well as import users and groups.

Noodle Prerequisites

  • Before enabling LDAP in Noodle ensure your license key will accommodate the total number of users( local and from the AD group).
  • Using SSL may require a client certificate installed on the Noodle server.

Configuration

The AD settings are in System Tools > Settings > Single Sign-On.

  1. Toggle Enabled to Yes
  2. Enter the Name or IP address of your DC
  3. Make a new user in AD in the Users Container with rights to search other users, and enter the display name and primary FQDN in the Noodle Administrative field, password in the password field.
    • yes the display name, not the user name.
    • Add the service user account to the "Read-only Domain Controllers" security group if read only is enabled in the Noodle AD settings.
  4. Make a new Security Group in AD, add some users and groups to it, and tell Noodle it's name.
  5. Tell Noodle the primary Domain of the users in the security group
  6. Save

You should see “Active Directory is synchronized” display at the bottom of the page after the first sync is complete.

Additional Information

  • Synchronizing fields: firstname, lastname, email, phone1, phone2, pager, mobile, fax, address, city, state, country, zip, note, expiry, change password on login, locked, manager (read only)
  • Other synchronizing fields can be added in "System Tools > People > Administration > Settings > User Fields" (add "CN=sAMAccountName" to enable 1996 authentication)
  • Noodle imports ONLY users and groups that are directly members to the “Group Name” specified in Noodle (users from sub groups will not be imported) and users must have a matching primary "domain" specified in Noodle.
  • AD changes are reflected in Noodle every 10 minutes by default.
  • Authentication requests are forwarded from Noodle to Active Directory in real time.
  • Multiple DCs can be used by separating the settings with commas.
    • The same number of commas should exist in all settings (think spreadsheet).
  • Backup DCs can be used by separating the IPs with semicolons.
  • When configuring AD from the cloud, port forwarding (or firewall rules and routes) must be configured. Please review the Microsoft documentation:
  • See also the AD Troubleshooting Guide.